Google Tag Manager (GTM) officially launched on the 1st of October 2012. That’s right, GTM is officially five years old this month - doesn’t time just fly by?
Google clearly wants to celebrate such an important anniversary, with GTM getting more attention than ever. It was only a few weeks ago that RegEx Tables were unveiled. This time around it’s the turn of Scroll Tracking and Element Visibility.
Scroll Tracking
Scroll tracking is a relatively simple concept; it lets you understand how far users are scrolling down your pages, which offers visibility on how your content is being consumed.
Until now implementing scroll tracking hasn’t been as simple as the concept itself. It has required a custom HTML tag installed with help from clever people like Luna Metrics.
Naturally, the solution worked perfectly well, but lengthy JavaScript functions have a tendency to look a smidge daunting to us mere mortals. Happily, that particular technical rift is no longer. It has been bridged by Google.
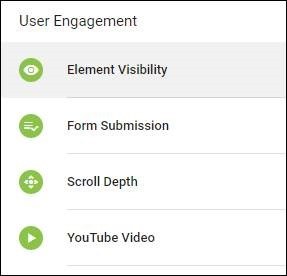
Head over to your GTM Container today, or indeed any day, and you’ll spot seven - yes, seven - delightful additions. Namely, two new triggers and five new variables.
GTM Scrolling Trigger
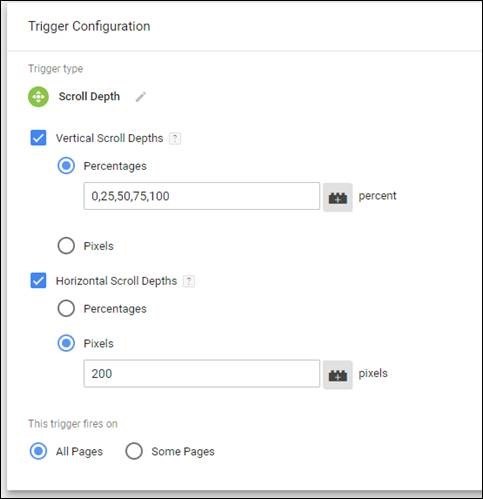
Google’s new scrolling trigger listens for when the user scrolls on a page. If attached to a tag the trigger will fire whenever scrolling to a certain depth occurs (e.g. 25%, 50%, 75%, 100%).
Here’s where things get fancy.
Unlike most of the manual implementations we’ve been forced to use until now, GTM’s own trigger will listen to horizontal scrolling, and not just vertical.
Step-by-Step
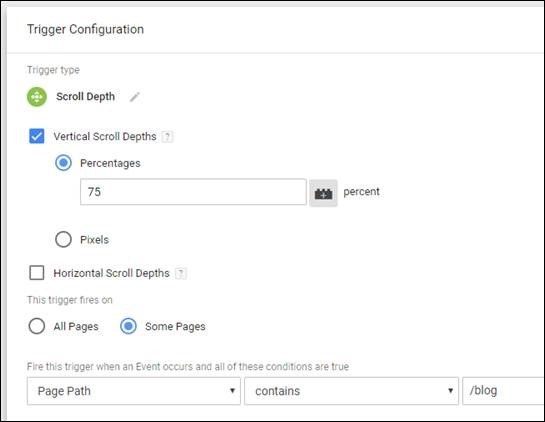
You can find the scrolling trigger in the User Engagement category, alongside the existing Form Submission trigger.
Using the tick boxes you can choose between vertical scrolling, horizontal scrolling or both.
Choose between measuring percentage scroll depth or pixel scroll depth
Type in, as a commented list, which percentages or pixels depths you want to count
Switch to ‘some pages’ to add additional conditions about page path, host name etc...
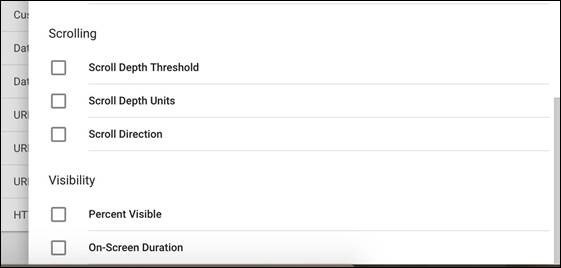
Along with the Scrolling trigger, there are three new Scrolling variables.
Scroll Depth Threshold – Either the percentage or pixel value
Scroll Depth Units – Percent or Pixel, depending on what is being measured
Scroll Direction – Direction of the scroll: vertical or horizontal
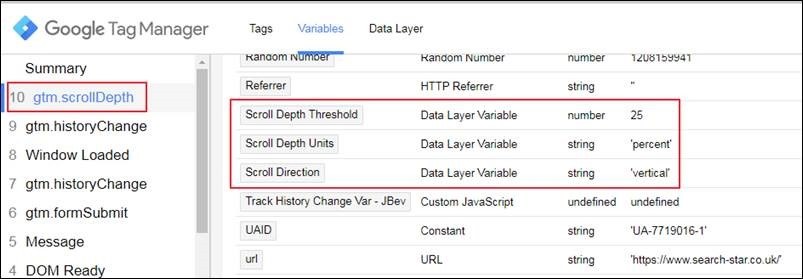
If you enable these variables and add the trigger, you should see them working in the preview panel.
Why bother?
Measuring scroll depth is an effective way of understanding how visitors to your website are interacting with your content. Your blog, for instance, may receive a lot of hits, but are the majority of readers making it all the way through?
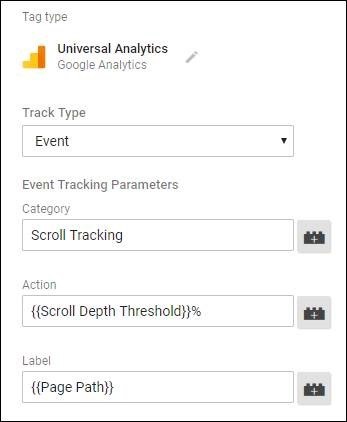
This approach is particularly useful if your main KPI isn’t something as clean cut as leads or transactions. Using this new trigger, you could fire a GA event tag when someone gets 75% of the way down a blog page. Then, in Google Analytics, set up an event-based goal and start measuring ‘blog reads’.
For this example, your tag and trigger in GTM might look something like this…
Element Visibility
Element Visibility is closely linked to scroll tracking, but takes what you can do that little bit further. Instead of tracking how far down a page a user is, this trigger will fire whenever a particular element of the page is in view. An image, for instance.
Step-by-Step
Choose between ID or CSS Selector for your selection method. Using ID will choose the first element on the page with that ID. The CSS Selector will match to an element or group of elements on a page. For a handy list of CSS Selectors check out W3Schools.
Select how often to fire this trigger. Once Per Page is exactly what it sounds like. Once Per Element will fire for each element that matches the CSS selection criteria. Every Time will fire each time an element comes into view, regardless if it’s already come in and out of view on a page.
The minimum percent visible can be used to limit the trigger to only fire when a certain percentage of the element is in view. This is great for large images, videos etc.
Similar to the percent visible, you can set a minimum on-screen duration, which causes the trigger to only fire when the desired element has been on screen for a certain number of milliseconds. (This is cumulative, so if the user scrolls to an image for 3 seconds, scrolls off and scrolls back for 2 seconds, it will count as 5 seconds viewing)
Choose whether to Observe DOM Changes – If this is selected the trigger will work for elements that aren’t present on the page when it initially loads, for example a pop-up thank you message.
There are also two new Visibility variables to use with this trigger:
Percent Visible – a measure of how much of the element is in view
On-Screen Duration – length of time (in seconds) that the element was in view
Why bother?
Element Visibility is an effective way of tracking how frequently users are making it to the bottom of your pages. Using the CSS selector footer we can listen for when the page footer comes into view. Sending an Event to GA when this happens will let you track how many users are reaching the bottom of the content.
Does this mean more work?
Not really. If you’re happy with how your scroll tracking is set up there’s no real reason to switch over. Having said that, if you haven’t enabled scroll tracking and would like to, it’s now super easy.
Besides, the more you know about how engaged your audience is the better.