So you’ve still not upgraded your Text Ads to Expanded Text Ads…
Written byJack SladekSenior Account Manager
TopicPPC
Date21.11.16
Since the launch of Expanded Text Ads earlier this year, Google has pushed the deadline from late October this year to January 31st next year. The “deadline” doesn’t mean your standard text will stop showing, but you’ll no longer be able to edit them from this date.
As soon as Expanded Text Ads (ETAs) launched, advertisers have been busy upgrading their old ads to the new format. We’ve found one of the safest approaches is to launch ETAs alongside your standard ads. Once the ETAs prove themselves, and begin picking up traffic, the standard ads can be phased out.
So, how can you quickly and easily create ETA versions of all of your standard ads? Lots of people we’ve asked are daunted by the idea of trawling through potentially hundreds of ad groups, writing high quality and relevant ads for each one.
For some, creating ETAs can give account managers the opportunity to give their accounts a complete overhaul. For others, a fast method that maintains ad relevance, landing pages and so on is best.
Let me show you the fast method!
You’ll need to have AdWords Editor and Excel or Google Sheets.
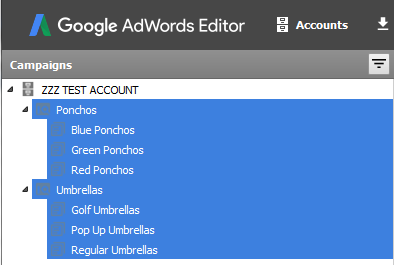
Our dummy account contains two campaigns. In each of the campaigns are three ad groups. In each ad group are two ads.
1. Open both Excel and AdWords Editor (AWE), and
2. The first thing you’ll need to do is download your account in to AdWords Editor (AWE) and view all your ads at once
This means selecting all ad groups in the Campaigns section of AWE, as shown:
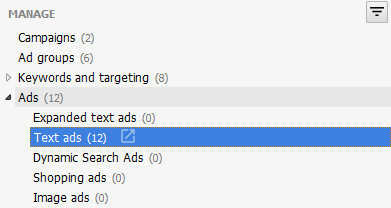
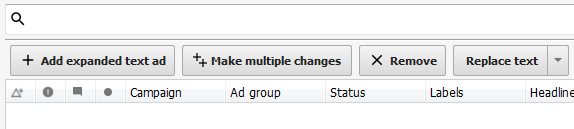
3. Now select Ads and then TextAds in the Manage section:
4. In the main window of AWE you’ll see all of your ads, across all campaigns and ad groups. Select all of them, and copy them. (If you have ad groups that already have ETAs, simply exclude appropriate ad groups from this selection).
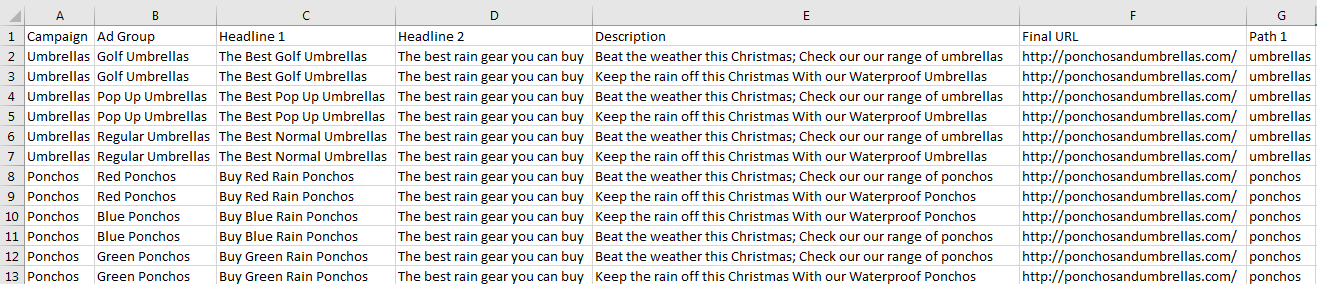
5. Open up a blank Excel sheet and paste of the ads. Delete all columns apart from the following:
Campaign
Ad Group
Headline
Description Line 1
Description Line 2
Final URL
You should end up with something like this:
I expect you’ll have a lot more ad groups than our example. This method works with any number of ads
6. Create the following new columns.
Headline 1
Headline 2
Description
Path 1
Path 2
The order isn’t important, but we find it easiest to lay it out like this:
7. This is where you have a few options. Our aim here is to use this spreadsheet to create all our new ads.
Your old headline was 25 characters max. Each new headline can be 30 characters.
Instead of two 35 character description lines, you now have one 80 character description line.
The display URL is no more; instead you have Path 1 and 2.
8. Let’s start with the Display URL, an easy one.
Path 1 and 2 replace the Display URL. Instead of choosing your entire Display URL, you just choose the ending and Google puts your domain as the first part.
For example, instead of the Display URL ponchosandumbrellas.com/umbrellas, we would just put umbrellas in the Path 1 field.
If our Display URL was ponchosandumbrellas.com/umbrellas/golf, we would put golf in Path 2. This would look like this:
In our example we don’t have a potential Path 2, we just have a Path 1. Let’s do the following to quickly create all the Path 1 field.
a. Highlight all the Display URLs b. Hit CTRL+H on the keyword (to open Find and Replace) c. Type in everything in the Display URL field, excluding words after the slash:
d. Don’t put anything in the Replace with field, make sure there’s not a [space] in it as well. e. Click Replace All. f. You're now left with this: g. Copy these and paste them in the Path 1 field. h. Delete the Display URL column.
9. Still with me? Let’s go back to the beginning and do both headlines.
Decide if you want to keep your old headline as Headline 1. Remember, you have an extra five characters to play with. If you want to keep your old headline, simply copy and paste the column contents in to the Headline 1 column.
If you want to write a new headline, use the old headline as a reference when writing the new one.
10. Headline 2, like Headline 1, is 30 characters max. You may be able to get away with having the same Headline 2 shared across lots of your ads.
To do this, put entry the copy in to the first cell, and drag it down to copy it in to the other cells.
11. In our example we’ve copied the original headline in to Headline 1 and writing a common Headline 2 for all ads: Once you’re happy with your new headlines, delete the old Headline column.
12. We’re nearly there. Next is the Description. Like before, you can write new copy here, but I’m going to show you a fancy way to combine your old description lines in to the new single line.
Remember though, the old Description lines totalled 70 characters. The new description line is 80 characters, so using this method won’t take advantage of all possible characters.
13. In the first Description cell type the following =concatenate(
14. Click on the corresponding Description Line 1 (the formula will now reference this cell)
15. Type ,” “,
16. Finally click on the corresponding Description Line 2 and click enter.
This is what it should look like before you click enter:
17. You should now have a single description line, which is a combination of your old ones. In between each like is a single space, that’s what the “ “ part of the formula was for.
18. Drag the cell down the bottom of your document. The cell references will change as you go down the page, make sure each description line for each ad pulls in the correct old description lines. Often the single space will be adequate to make the new description line read OK, but you may need to go in a make edits here and there. But wait! You’ll need to make the new description line text, instead of a formula.
19. Highlight the all of the cells in the column.
20. Copy the whole column and paste special as Values Only.
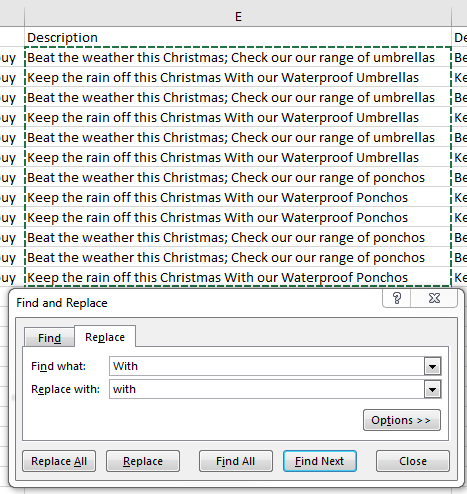
21. Now go through and fix parts that don’t look right. Find and Replace is your best friend here (CTRL+H)
In our example we can use Find and Replace to make the word With lower case, as it doesn’t look good with a capital W:
22. Delete the old description lines at this point. You should be left with something like this:
23. It’s time to import these Expanded Text Ads back in to AdWords. If you need to check character limits you can use the =len formula.
24. Copy all of the cells in Excel
25. Go to AdWords Editor (AWE). Go to the Expanded Text Ads in the Manage section.
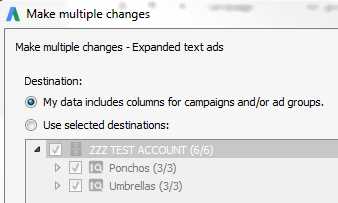
26. Click Make multiple changes at the top.
27. Check the radio box My data includes columns…
28. Click Paste from clipboard. All of your ads should fill the window.
29. Check each column title lines up with what it should:
30. Click Process.
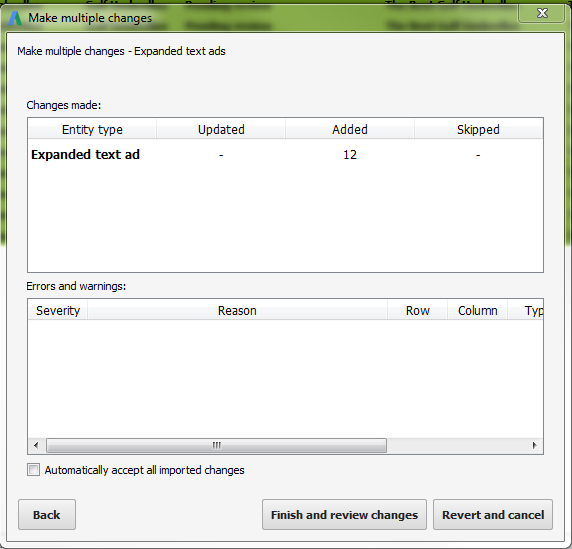
31. AWE will report on what changes you made. If you did everything right, you’ll see no errors. Click Finish and review changes:
32. You should now see Expanded Text Ads in each ad group in the account. Click Keep at the top to save the new ads. You’re now ready to post your changes.
This will add the ads to each ad group, whilst not changing the status of the old ads. Leave the old ads in there for the time being, as you don’t need to rush to remove them
Congratulations on getting to the end. If you need any help with setting up your Expanded Text Ads, drop us an email.